前回ステージを作ったのでこのゲームも本格的に遊べるようになってきました。しかし今の状態だと単純に敵を避けながらコインを集めるだけで、正直あまり緊張感がないので、できればもう少し味付けをしたいものです。
そこで、ここではゲームに制限時間を設定できるようにします。そのために
- カウントダウンタイマーのC#スクリプト
- タイマー用のUI(+ついでにコインの残り枚数表示)
を作っていきますね。
各種UIの作成
では、まずはじめに次の2つのUIを作成します。
- カウントダウンタイマー用のテキスト
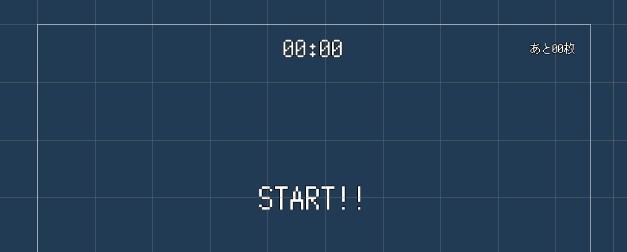
- カウントダウン用のテキスト(3,2,1,START!の表示)
- あと何枚コインを集めればよいのかを表示するためのテキスト
カウントダウン関係のテキストを作るついでに、コインの枚数を表示するUIも作っておきましょう。
UIを作るにあたっては新しいキャンバスを作っても良いのですが、「くろくま基本アセット」を導入してあれば「MainCanvas」(「Prefabs」→「UI」→「Canvas」内)というキャンバスのプレハブが用意してあるので、それにテキストを追加することにします。
ダブルクリックしてプレハブ編集画面を開いたら、次の画像のように「Text_White」プレハブを配置してください。
できたら、各テキストの名前を次のように変更します(※あとでスクリプトから検索するので間違えないようにしてください)。
- カウントダウンタイマー用テキスト:TimerText
- カウントダウン用のテキスト:CountDownText
- コインの残り枚数表示用テキスト:CoinText
ちなみに、このメインキャンバスはゲーム開始時にGameManagerが勝手に生成してくれるようになっているので、シーンに置いておく必要はありません(※注)。
※注:なおデフォルトではタイトル画面でのみ生成されないようにしてあるので、タイトル画面でカウントダウンタイマーが表示されることはありません。
カウントダウンタイマーのC#スクリプト
そうしたら、次はカウントダウンタイマーのC#スクリプトを書いていきます。新しいC#スクリプトを作り、名前を「TimeManager」に変更したら次のコードを書いてください。
using System.Collections;
using System.Collections.Generic;
using UnityEngine;
using UnityEngine.UI;

public class TimeManager : MonoBehaviour
{

  [System.NonSerialized]
  public bool isActive = false;

  [SerializeField]
  int minutes = 1;
  [SerializeField]
  float seconds = 0;
  [SerializeField]
  string timerTextName = "TimerText";
  [SerializeField]
  string countDownTextName = "CountDownText";

  Text timerText;
  Text countDownText;
  float currentTime;
  float oldSeconds;
  float totalTime;
  GameManager gameManager;

  void Start()
    {
    timerText = GameObject.Find(timerTextName).GetComponent<Text>();
    countDownText = GameObject.Find(countDownTextName).GetComponent<Text>();
    countDownText.enabled = false;
    gameManager = GameObject.FindGameObjectWithTag("GameController").GetComponent<GameManager>();

    InitTime();
    StartCoroutine("CountDown");
    }

    void Update()
    {
    Timer();
    }

  void InitTime()
  {
    oldSeconds = 0f;
    totalTime = minutes * 60 + seconds;
    currentTime = totalTime;

    SetTimeText();
  }

  void Timer()
  {
    if (!isActive || currentTime <= 0f)
    {
      return;
    }

    currentTime = minutes * 60 + seconds;
    currentTime -= Time.deltaTime;

    minutes = (int)currentTime / 60;
    seconds = currentTime - minutes * 60;

    if ((int)seconds != (int)oldSeconds)
    {
      SetTimeText();
    }

    oldSeconds = seconds;

    if (currentTime <= 0f)
    {
      isActive = false;

      //ここに制限時間終了時の処理
      gameManager.GameOver();
    }
  }

  IEnumerator CountDown()
  {
    yield return new WaitForSeconds(2);

    countDownText.enabled = true;
    countDownText.text = "3";
    yield return new WaitForSeconds(1);

    countDownText.text = "2";
    yield return new WaitForSeconds(1);

    countDownText.text = "1";
    yield return new WaitForSeconds(1);

    countDownText.text = "START!!";
    isActive = true;	//タイマー開始
    GameObject.FindGameObjectWithTag("Player").GetComponent<PlayerController>().isActive = true;	//プレイヤーを動けるようにする
    yield return new WaitForSeconds(2);

    countDownText.enabled = false;
  }

  void SetTimeText()
  {
    timerText.text = minutes.ToString("D2") + ":" + ((int)seconds).ToString("D2");
  }

}
基本的な処理内容はユニティちゃんパルクールのカウントダウンタイマーと似ていますが、今回のゲーム用に処理を書きなおしてあります。
書けたらこれを新しいゲームオブジェクト(名前を「TimeManager」にしてください)にアタッチして、制限時間を設定してください。さらにこのTimeManagerのタグも「TimeManager」にしてください(※新しくタグを作りましょう)。
GameManagerの変更
タイマーができたら、またしてもGameManagerを変更します。GameManagerスクリプトを次のように変更しましょう(※適宜省略してあります。「追加その2」というコメントがある部分が該当箇所です)。
using System.Collections;
using System.Collections.Generic;
using UnityEngine;
using UnityEngine.UI;	//追加

[RequireComponent(typeof(MoveSceneManager))]
[RequireComponent(typeof(SaveManager))]
[RequireComponent(typeof(SoundManager))]
[DefaultExecutionOrder(-5)]
public class GameManager : SingletonMonoBehaviour<GameManager>
{

  //省略

  MoveSceneManager moveSceneManager;
  SaveManager saveManager;
  SoundManager soundManager;
  TimeManager timeManager;    //追加その2
  Text coinText;		//追加その2

  //省略

  public int CorrectedCoins
  {
    set
    {
      correctedCoins = value;

      UpdateCoinText();    //追加その2

      if (correctedCoins >= numOfCoins)
      {
        Clear();
      }
    }
    get
    {
      return correctedCoins;
    }
  }

  //省略

  //--ここから追加--

  //ゲーム初期化メソッド
  public void InitGame()
  {
    isClear = false;
    isGameOver = false;
    numOfCoins = GameObject.FindGameObjectsWithTag("Coin").Length;
    correctedCoins = 0;

    //追加その2
    if (moveSceneManager.SceneName != "Title")
    {
      timeManager = GameObject.FindGameObjectWithTag("TimeManager").GetComponent<TimeManager>();
      coinText = GameObject.Find(coinTextName).GetComponent<Text>();

      UpdateCoinText();
    }
  }

  public void Clear()
  {
    if (isClear || isGameOver)
    {
      return;
    }

    isClear = true;
    GameObject.FindGameObjectWithTag("Player").GetComponent<PlayerController>().isActive = false;
    timeManager.isActive = false;	//追加その2

    //クリア画面のキャンバスを生成
    Instantiate(clearCanvasPrefab, transform.position, Quaternion.identity);

    //ボタンのコンポーネントを取得
    Button nextButton = GameObject.Find(nextButtonName).GetComponent<Button>();
    Button titleButton = GameObject.Find(titleButtonName).GetComponent<Button>();

    //ボタンに、クリックしたときの処理を登録
    //ただし「次のステージ」ボタンは次のステージがないときは押せないようにする
    if(moveSceneManager.CurrentSceneNum < moveSceneManager.NumOfScene - 1)
    {
      nextButton.onClick.AddListener(() => moveSceneManager.MoveToScene(moveSceneManager.CurrentSceneNum + 1));
    }
    else
    {
      nextButton.interactable = false;
    }

    titleButton.onClick.AddListener(() => moveSceneManager.MoveToScene(0)); //タイトル画面に戻るので、シーン番号は0番
  }

  public void GameOver()
  {
    if (isGameOver || isClear)
    {
      return;
    }

    isGameOver = true;
    GameObject.FindGameObjectWithTag("Player").GetComponent<PlayerController>().isActive = false;
    timeManager.isActive = false;   //追加その2

    //ゲームオーバー画面のキャンバスを生成
    Instantiate(gameOverCanvasPrefab, transform.position, Quaternion.identity);

    //ボタンのコンポーネントを取得
    Button retryButton = GameObject.Find(retryButtonName).GetComponent<Button>();
    Button titleButton = GameObject.Find(titleButtonName).GetComponent<Button>();

    //ボタンに、クリックしたときの処理を登録
    retryButton.onClick.AddListener(() => moveSceneManager.MoveToScene(moveSceneManager.CurrentSceneNum));	//リトライなので、今と同じシーンを再読み込み
    titleButton.onClick.AddListener(() => moveSceneManager.MoveToScene(0));	//タイトル画面に戻るので、シーン番号は0番
  }

  //追加その2
  void UpdateCoinText()
  {
    coinText.text = "あと" + (numOfCoins - correctedCoins).ToString() + "枚";
  }

}
プレイヤーキャラの設定の変更
さて、これでカウントダウン処理を作れましたが、このままだとカウントダウン中もプレイヤーが動けてしまうのでプレイヤーキャラの設定を変更します。
まず「BaseCharacterController」を開いて、次の「InitCharacter」メソッドの一行をコメントアウトします。
protected virtual void InitCharacter()
{
  Hp = maxHP;
  Speed = defaultSpeed;
  direction = transform.localScale.x; //追加

  //isActive = true;	//ここをコメントアウト
}
次にPlayerのプレハブを開いて、PlayerControllerコンポーネントの「有効にする」のチェックマークをOFFにしましょう。これでユニティちゃんが動かないようになります。カウントダウンタイマーのスクリプトを見てもらえばわかる通り、カウントダウンが終わった時点でこのチェックをスクリプトからONにするのでこれで大丈夫です。
実際にゲームを動かして下のGIFのようになればOKです。これで完成まであと少しになりました。
(クリックで再生)
次のページ→サウンド(BGM・SE)のつけ方